Today we have a special guest that has been testing for us for awhile now and has created a hack for Clover that we think you might enjoy. If you're subscribed to our newsletter you may remember seeing this hack in one of our monthly inspiration newsletters, but if not, here it is.
(If you're not subscribed to our newsletter, consider it. It's the best way to make sure you are aware of any new information or updates and we never bombard your inbox. Check out this link and get the Cloudberry Collection pattern for FREE and stay informed on sales and new patterns.)
This is a very detailed blog post with thorough instructions and I hope you enjoy the work that Josée has put into this. Without further ado, I'm handing this over the Josée (AKA @couds_moi_ca) who can find on IG here.
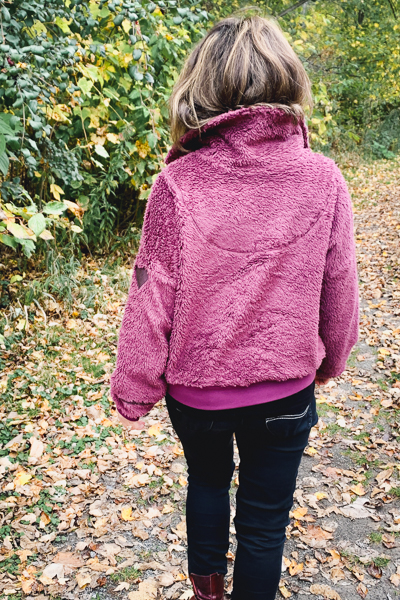
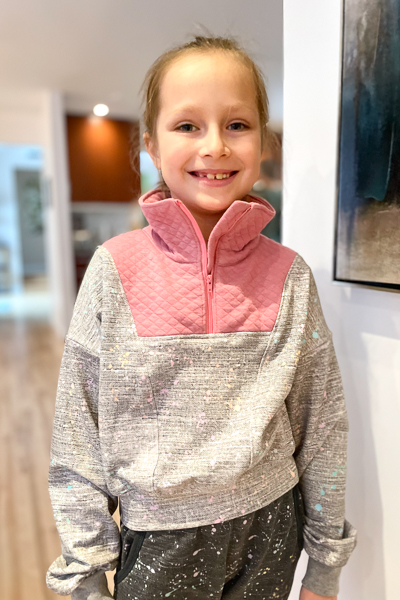
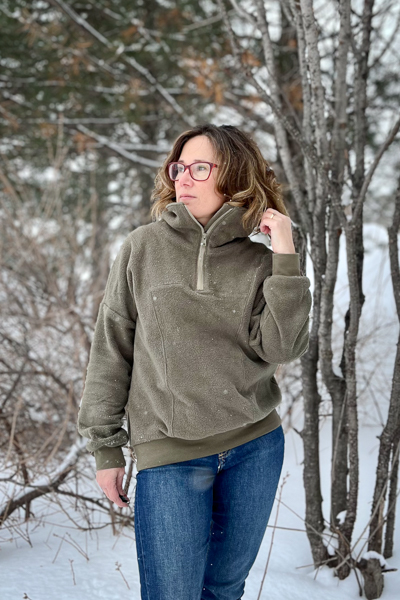
Welcome to my first sewing blog post. I’m excited to introduce the Clover modification to create a gorgeous half-zip sweater. As a hacker, I love to find new ways of doing things and create items that are unique. Whether it is sewing, baking or even hiking, I enjoy adding details and changing the steps. The results are sometimes surprising, and the journey is always fun. There is always an opportunity to discover something new when going off the unbeaten track. This is what happened when I sewed my purple Sherpa Miss Clover. The hoodie became a half-zip with a wide collar that, once zipped up, turned into a cozy funnel neck keeping my face warm. I achieved this look by hacking the Miss Clover while at the same time, keeping true to the pattern by showing off its style lines. The hack is not a complicated one, but it does require a few modifications to some of the pattern pieces as well as the order in which they are sewn.


For a while, I wanted to make myself this type of sweater. Although I had seen hacks with a slash and insert method, I wanted something different. What I was looking for specifically was a sweater with a lined front and back yoke to highlight the zipper and add structure. When I first saw the Miss Clover, I was attracted to its style lines, the deep curve in the back and the front vertical lines. The Miss Clover was perfect for what I had in mind with a simple modification of the inner pieces. The method that I used and that I will demonstrate below will result in a professional finish that looks as pretty in the inside as on the outside with a lined yoke built around the half-zip. It will guarantee you a clean finish of the zipper while at the same time, it will make use of the beautiful style lines from the Clover.
SUPPLIES:
For this modification, you will need a zipper and fusible interfacing. I opted to use a medium weight activewear zipper and the length will depend on the size you are sewing and how high you want the neckline. It does not matter if you have a closed end or separating zipper as the lower ends will be trimmed.
PATTERN PREPARATION:
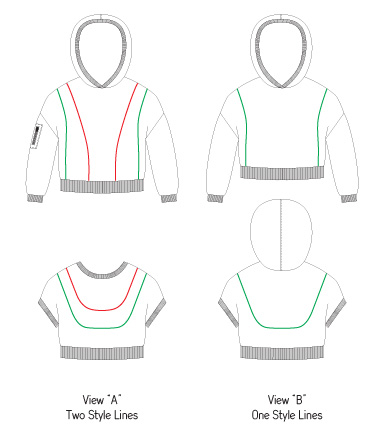
You will need to print (or trace if using a projector) the following pieces from View “A”: Three front pieces (Front Center, Front Middle and Front Side), three back pieces (Back Bottom, Back Center, and Back Top), and the hood.
NOTE: The Half-Zip Clover features a lined yoke that is based on only the innermost (red) lines from View “A.” (See the line drawings diagram below for reference.) You will be using the pieces for view “A” which include both the inner (red) style lines and the outer (green) the style lines. These pieces will be modified in the following steps to remove the outer (green) style line.
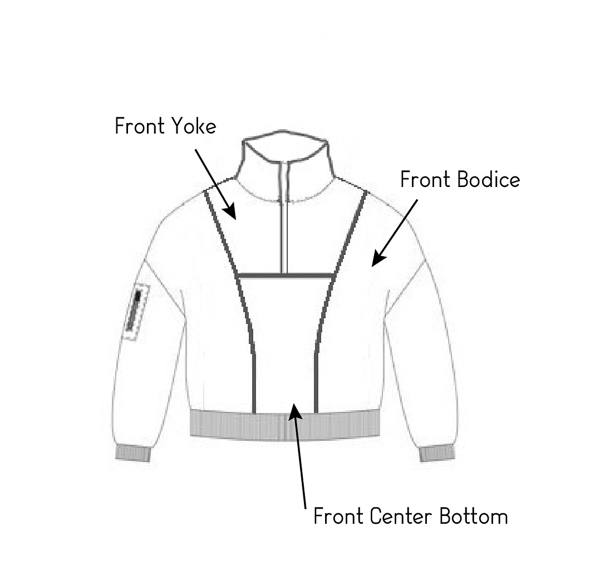
CREATING A NEW FRONT BODICE:
Join the Front Side and Front Middle pattern pieces by overlapping at the curved edge.
When joining pattern pieces together, the pieces will overlap by an amount that is equal to the seam allowances of both pieces. 3/8” on one piece plus 3/8” on the second piece give a total of 3/4”. When joining two pieces it is helpful to make small marks at 3/4” away from the cut edge on one of the pieces. These marks serve as a visual guide when aligning the two pieces and help to ensure that the overlap is of the right amount.
This new pattern piece is now called Front Bodice and will be cut mirrored from the main fabric.

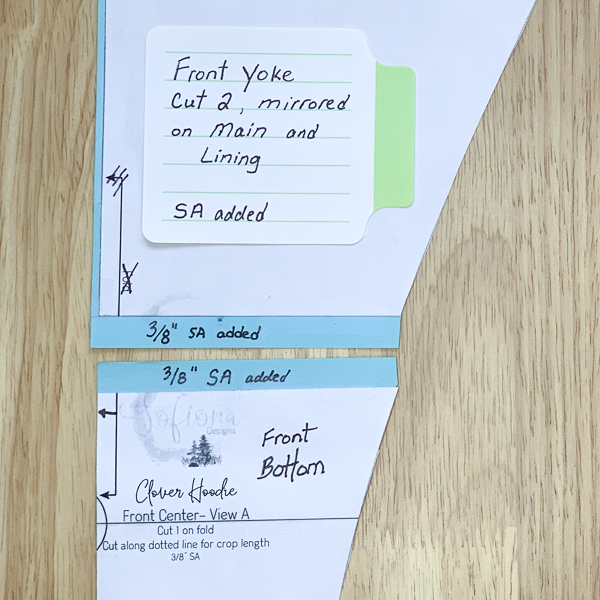
CREATING THE NEW FRONT YOKE AND BOTTOM. For the yoke and lower center, cut and separate the Front Center piece horizontally about a third way down from the top of the pattern piece. Add a 3/8-inch (1 cm) seam allowance to both pieces at the new cut line. Don’t forget that!! The bottom piece is now called Front Center Bottom and will be cut on the fold from the main fabric. On the top piece, add an additional 1/8-inch (3mm) to the center front edge. The top piece is now called Front Yoke and is cut mirrored from the main fabric and from the lining fabric.
Your front will now consist of three pieces: the Front Bodice, Front Yoke and Front Center Bottom.
CREATING A NEW BACK BODICE. Join the Back Bottom and Back Center pattern pieces at the seam line overlapping the seam allowances the same way as the front with a 3/4” overlap. This new pattern piece is now called Back Bodice and will be cut on the centre fold line from the main fabric.
The Back Top remains unchanged and will serve as the back yoke. Cut the Back Top on the fold from both the main and lining fabrics.

CREATING A COLLAR. Prepare the collar from the Hood piece using the “stretch” line on the pattern piece as a guide for drafting the Collar.
First, create the back of the Collar by drawing a vertical line perpendicular to the stretch guideline. The Collar will be cut on the fold without a center back seam. Draw the vertical line 3/8” inside from back of the hood at the bottom corner. This removes the seam allowance. The new vertical line is the centre back fold line of the Collar.
Next, reshape the center front of the Collar by adding another perpendicular vertical line 5/8 inch (1.5 cm) further outside of the Center Front at the bottom corner. This extra fabric replaced the Hood Trim which will not be used in this hack.
For the top of the Collar, draw a horizontal line above the neckline with a very slight slant from center back down to the center front. The line should still be straighter than the curved neckline edge at the bottom. (The height of the Collar will vary depending on whether you are making a child size or miss size Clover. It will also vary according to how high you wish the collar to extend over the chin/nose once zipped up and how far you want it to lay flat on both sides when left open. For reference, the collar on my purple Sherpa sweater is 5 inches up from the neckline at the back and 5 6/8 inches up from the neckline at the front.)
You now have a Collar piece. Cut the Collar on the fold from both the main fabric and lining.

Observation: The height of the collar at center front and center back is slightly different with a longer length on the front. This is because the neckline scoops down lower at center front than at center back.
USING INTERFACING. The use of interfacing is optional. It adds more body to the Collar and gives it a bit more shape when fully zipped. It also adds stability to the Zipper Guard and zipper edge.
On the Front Yoke, apply 3/4 inch (2 cm) wide strips of interfacing along the center front edges. Interface one half of the Zipper Guard lengthwise. Finally, for the Collar, you have the option of adding interfacing to the full piece or at the center front edge only. This will depend on how much structure your fabric has and how much you want the collar to stand straight up. For reference, I added lightweight interfacing to my Sherpa collar as it had a lot of drape. For the blue soft sweater, I added strips of interfacing at the center front only and it has held up quite well on its own.

SEWING TUTORIAL STEPS.
These steps will replace steps 15-25 and steps 28-39 of the Clover tutorial for the construction of the Bodice, Collar and Hood.
1. Pin the Back Bodice to the Front Bodice pieces RST at the shoulders. Sew/serge together and press the seam allowances toward the back.

2. Pin the main Back Yoke to the main Front Yoke pieces RST at shoulders. Sew/serge together and press the seam allowances toward the front.

3. Pin the main Collar to the neck seam, RST, aligning the notches with shoulder seams, center back and front edge. Sew/serge together. Press the seam allowance toward the collar. Repeat for the Lining, pressing the seam allowances in the opposite direction.

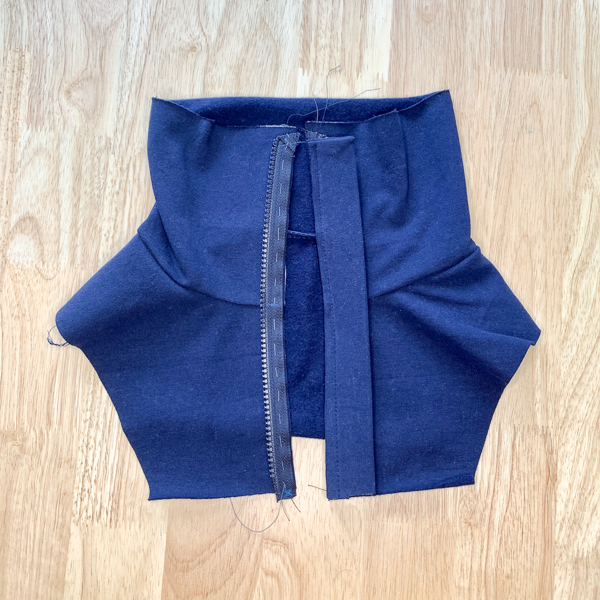
4. CREATING THE ZIPPER GUARD. After pressing the seam in step 3, measure the length at the front center from the top of the collar to the bottom of the yoke. Cut a rectangular piece of fabric 2 3/4 inches wide by the length of your measured front center Collar/Yoke.
The zipper guard may be cut from the main or lining fabric. I cut mine from Sherpa to add extra coziness. Remember the Zipper Guard will be visible when open and be resting against the neck/chin when zipped up.
5. Fold the Zipper Guard lengthwise RST. Sew across one short end. The sewn end will be the top end of the Zipper Guard. Clip the corner and turn inside out. Optional: Baste the long edge closed after turning.

5. ZIPPER PREPARATION. Ensure that your zipper is equal or longer than the center front edge from Collar to Yoke before starting. Fold down the upper ends of the zipper tape as in the picture below and stitch these in place.

6. (No picture for this step.) With the zipper closed, lay it beside the center front Yoke/Collar piece with the top teeth 5/8 inch (1.5 cm) down from the top raw edge of the Collar. Mark on both sides of the zipper tape where the neckline seam is located. This will help to align the zipper during construction.
IF you are comfortable removing and reattaching zipper pulls, you can do the following steps with the zipper is separated. When separated, the zipper is easier to handle and sew in place and you can reinsert the zipper pull once the lining is attached. If your zipper is separated, mark the side that has the lowermost tooth to ensure a proper alignment when reinserting the zipper pull.
For those that do NOT wish to separate the zipper, mark on both sides of the zipper tape where the bottom of the yoke is. This is very important to make sure the fabric is even on both sides of the zipper.
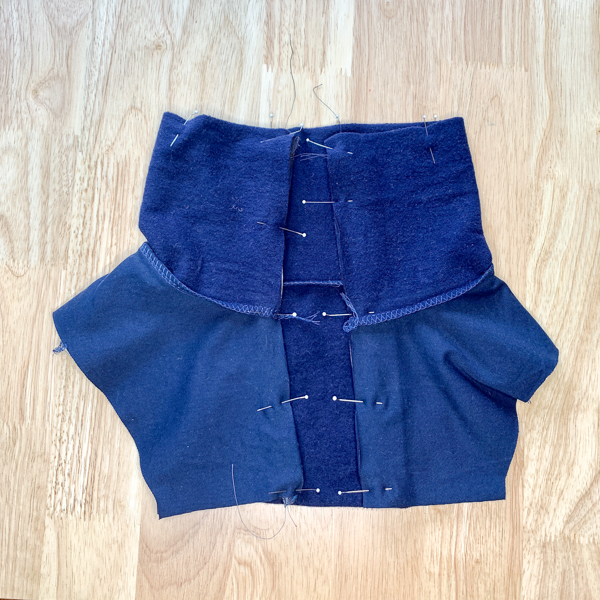
7. Place each side of the zipper RST along to the edge of the Yoke/Collar. The top teeth on each side of the zipper should be 1/2 inch (1.3 cm) from the top raw edge of the Collar and the marked locations should be in line with the neckline seam and the bottom of yoke. Hand baste in place then sew using a zipper foot and a 3/8 inch (1 cm) seam allowance. Verify that the neckline/collar seams align when zipped up and adjust if necessary.

8. Pin the Zipper Guard to the LEFT center front edge of the Collar/Yoke matching the raw edges. The zipper will be sandwiched between the Collar and the Zipper Guard. Ensure the top finished edge of the Zipper Guard is 1/2 inch (1.2 cm) down from the top raw edge of the Collar. Baste or pin in place.
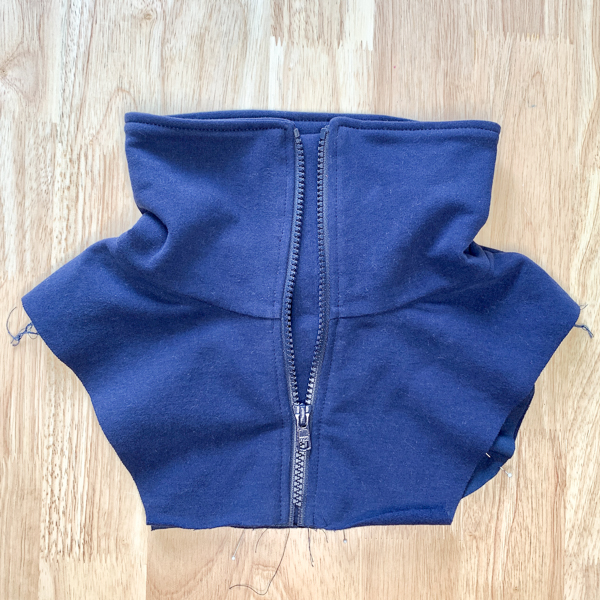
9. Pin the Lining RST with the main Yoke/Collar. The zipper and Zipper Guard will be sandwiched between the main fabric and lining. Sew along the center front, around the top of the Collar, and down the opposite centre front edge. Be careful not to catch the Zipper Guard in the stitches along the top edge. Clip the two corners and turn inside out. Press carefully. Top stitch the center front edges and top edge of the Collar at ¼ inch.
Et voila, the zipper is fully enclosed, and your Collar is finished with no visible seam allowances or zipper tape. Stop and admire your work. The hard work is done.
If you separated the zipper, now is the time to reattach your zipper pull. If you did NOT remove your zipper pull, zip up and WAIT to trim your zipper till later steps.
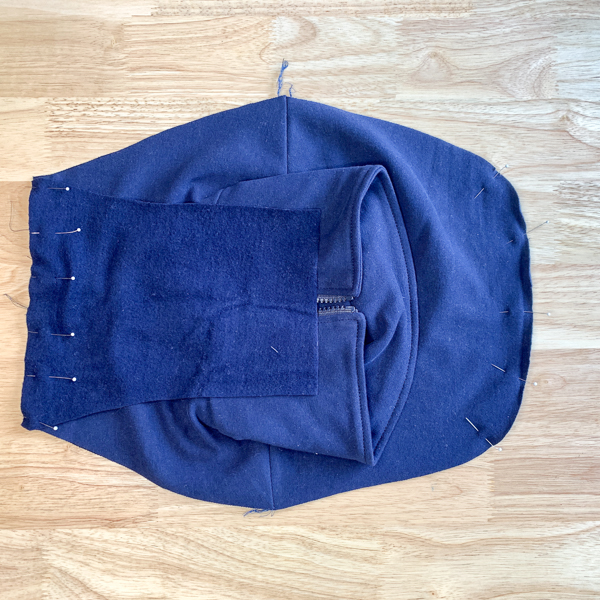
10. You will now finish the center front by adding the Front Center Bottom to the Yoke. Pin the Front Center Bottom to the Front Yoke, matching the center front with the center of the zipper. Sew carefully, particularly when going across the zipper. It may be necessary to use a long stitch when going over the zipper, slow down and use the hand wheel. You do not want to hit the zipper teeth and break a needle. Press the seam allowance down. Optional: Topstitch at ¼ inch.
NOW you can trim any excess zipper tape up to a 3/8" seam allowance.
TIP: When trimming the zipper, you may also remove excess zipper teeth in the seam allowance section. This will eliminate bulk and permit you to finish the edge with a serger.
11. Assemble the completed Center Front and Back Yoke to the main Bodice Front and Back, matching notches. Sew or serge together RST. Press seam allowances down and outward. Topstitch if desired.

You are now ready to complete the sweater by adding the sleeves, cuffs and hemband as per the Clover tutorial instructions.

This single style line version of the Clover with a half-zip has a great shape and style. It is also a great option to showcase a cute patch or other detail to the yoke for a truly personal touch. We can’t wait to see your version and what you come up with. And don’t forget to post it in the Sofiona Sewing Group.

A final thanks to Josée for this amazing option for an already favourite pattern. All the fabrics she used for this tutorial including her final versions were purchased from Mimifabrics. From sherpa fleece to soft sweater french terry the super cozy marshmallow fleece. Mimi Fabrics has a lot of great options for your own Clover hack or many other makes. I love the selections.
Click here to check out the sherpa.
Click here to see the soft sweat.
And finally, click here for that fun marshmallow fleece.