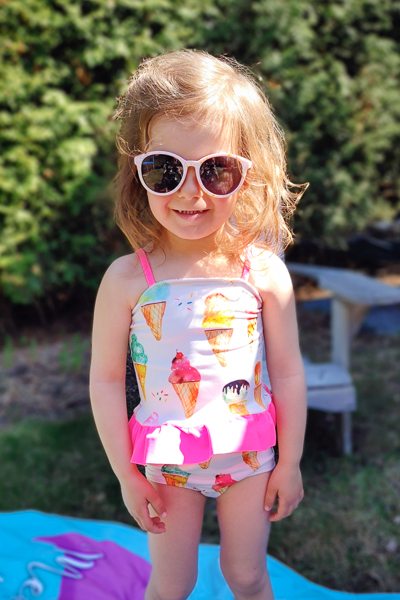
After taking a year off of swim design we're back this spring with TWO swim patterns. This blog post is all about the Pike and has quite a few tips and hacks you'll want to know about. A couple can also be used on other suits so after having a look here, hop on over to this link to see all about Minnow.
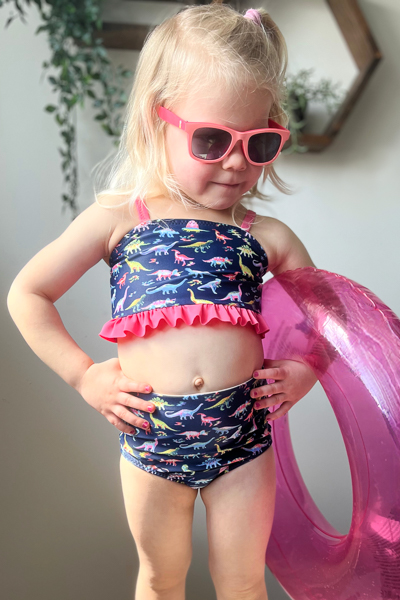
So, Pike was intended to be a fairly basic design. I DID end up adding things as I went (as I tend to) but overall the shape is simple. Let's look at the line drawings.
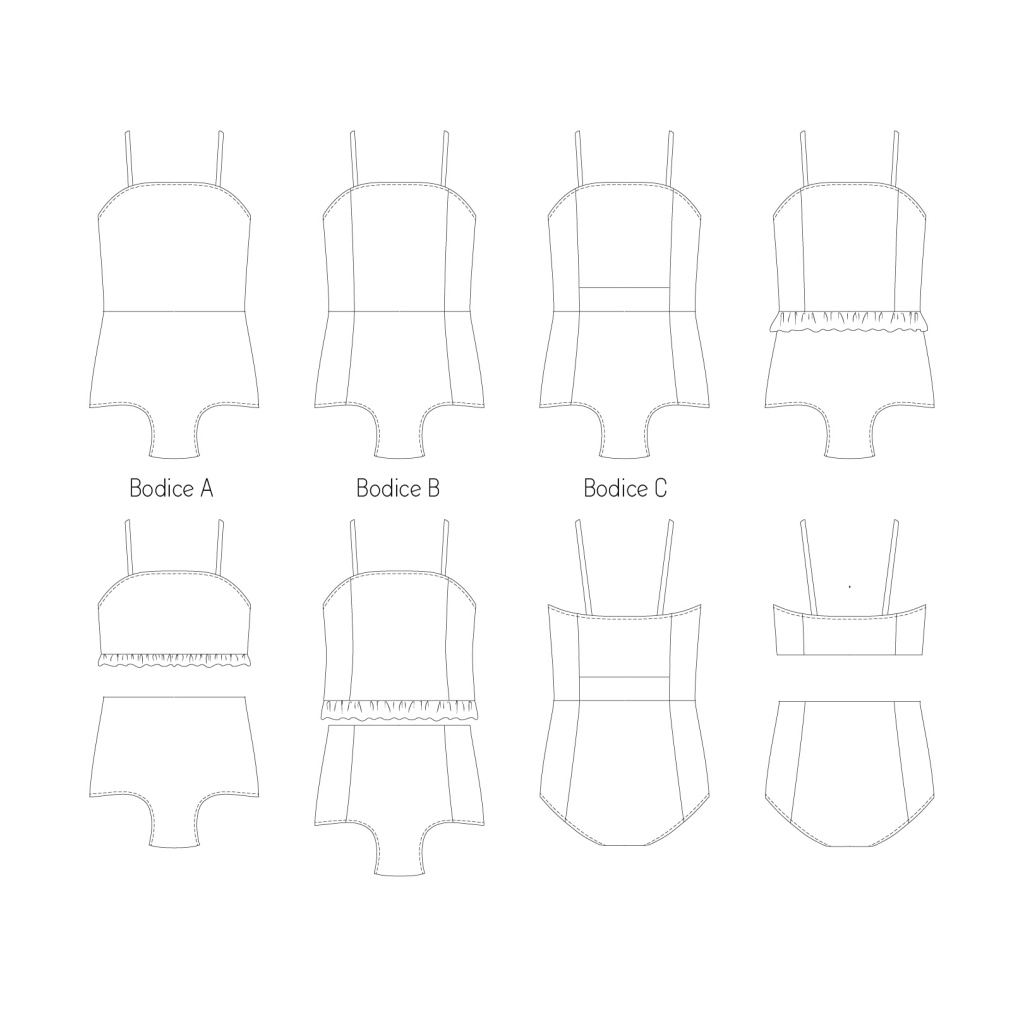
The options on Pike go like this:
- 1 or 2 piece swimsuit
- Vintage style leg opening
- Fully lined
- Simple straps
- Narrow or wide ruffle (optional)
One piece:
- solid or pieced bottom section
- solid (A), pieced (B), or pieced with insert (C) bodice section
- optional ruffle in the waist seam
Two piece:
- solid or pieced high rise bottoms
- solid (A) or pieced (B) bodice
- tankini or cropped bodice length
- optional ruffle for bodice hem

Size Choice
Choosing a size is always a bit scary for those who don't sew muslin versions first. Now, I can't really help you with that, cuz that's a personal choice/gamble, but here's something to consider for Sofiona patterns in general. When choosing sizes for ANY Sofiona pattern, keep in mind that we draft for and recommend that you size up into the next size only once you have reached the measurement exactly between two sizes.

For example, when looking at the trunk measurements here, if the trunk (some people call it girth) is 53" you can see it falls between the size 10 and 12. Because it's past the midway point and closer to the size 12, you should choose the 12 for trunk and then expect that it will be slightly long to begin with. Or, what if the trunk measurement is 52"? Then we would recommend keeping with the size 10, but expect that it might not last quite as long into the future.
The exceptions for this rule are ONLY when you prefer a different fit. We draft in such a way that any of our garments fit exactly at that size as per OUR size chart (not your favourite RTW store's size chart). We do not draft "grow-with-me" sizing and when it comes to our swimsuits, we design fitted swimsuits. If your child - or whoever you are sewing for - PREFERS a looser fit, you can choose to size up, but please note we have not tested that way. Obviously, one should always consider making a muslin first or accept the gamble.

Frustrating Wavy Seams
Something that I found a bit frustrating when I was muslinning my tankinis was how the ruffle looked on my custom swim knits. I don't know about you, but I do find that my pretty prints (that I've usually bought in custom orders....) are thinner fabrics and they show issues a bit more by the fact that they are not as structured as my other swim fabrics. One of those unlikeable issues was that they seemed to stretch out kinda ugly every time I added the ruffle. And I was SOOOOO careful not to stretch my fabric. I tried different stitches, different tensions, different machines.... and still would get these wavy seams that really took away from the professional finish I want. So I went to a "stay elastic" method. Now before you tell me "I already knew about that. Why are you only now figuring this out?!" I will say "Hey! I've been avoiding this with all that's in me because it was one more step and I didn't WANT one more step!" LOL It's laziness, people. Laziness. But maybe you are also suffering from that same affliction so I need to let you know I did this experiment for YOU!
In the following image you can see how I stabilized the bottom hem of the tankini by basting a 1/4" clear elastic to the wrong side of the main bodice hem. I liked the 1/4" stuff because I knew it would stay inside the seam allowance. I did no more/no less that 1:1 with the fabric all the way around the hem and then continued with regular tutorial instructions.
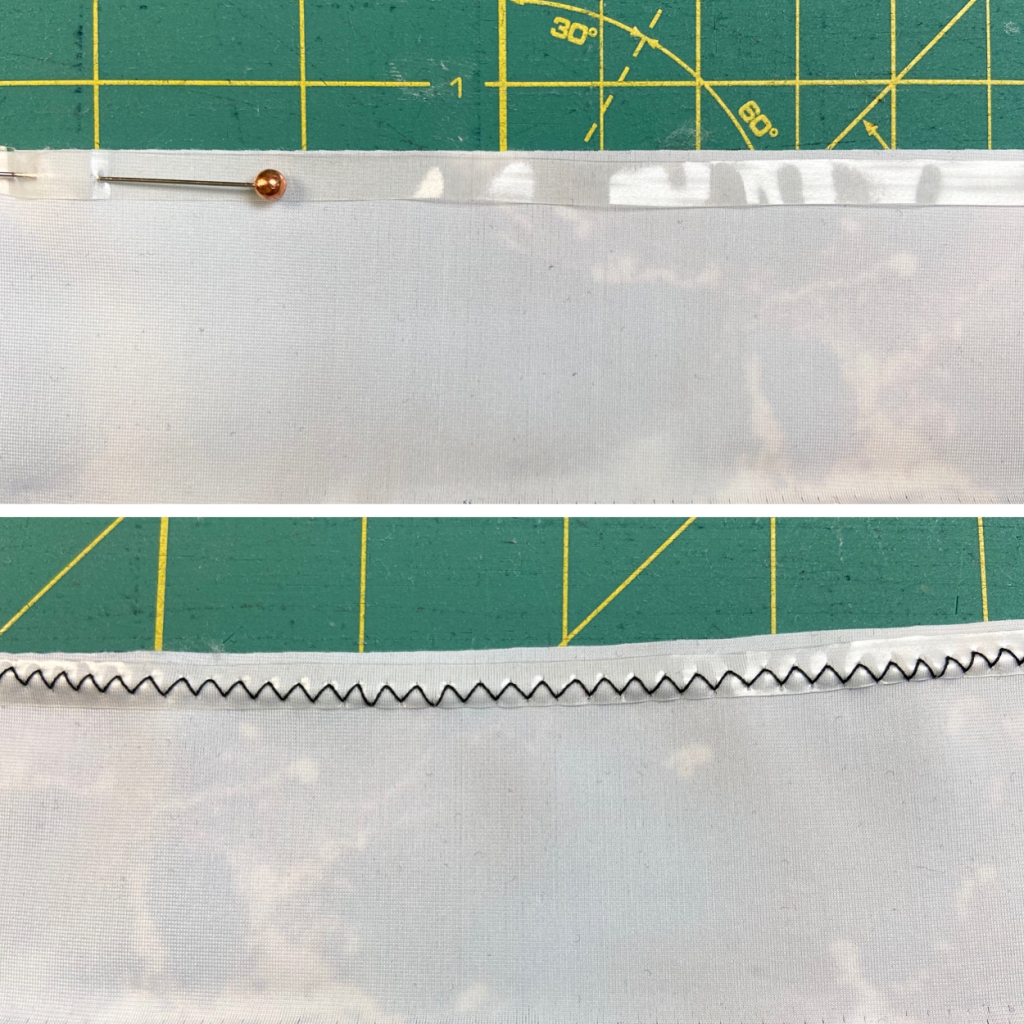
Here's an example with some scraps so you can see the difference. That wavy edge that was happening with allllllll my careful sewing went away as soon as I stabilized with that stay elastic! AND I did a measure test and my wavy seam was 5/8" longer than when I started. This is a pretty big deal because my sample piece wasn't very wide to begin. With that percentage of "growth" on the longer edge of an actual garment, that bottom edge will have stretched out more than 2 sizes worth!!!

So there you have my endorsement for stay elastic and saving your ruffled hems.


Alternative Strap Construction
One thing that matters to me when sewing for me or my kids is that I really want my makes to look and feel like something purchased from a nice store. Probably because as a kid it was the RTW stuff that was the "treat" since mom sewed most of our clothes at least for the first few years. So having that serged finish or professional seam is something that I enjoy and attempt to include in all our patterns.
These days I look at RTW and think "I can do better" so now it's ALSO about making something look clean in and out. We all have seen RTW garments that really show the short cuts they take to whip up a few thousand of whatever it is, right?
In the case of a swimsuit, I find that handmade straps can very easily get bulky and stiff and just not something I feel proud of. So I went looking for a method that wouldn't be as thick as methods I've done on suits in the past. I came across 2 methods that I liked. The one that you'll find in the tutorial edged out as winner for this pattern simply because we do hear enough comments about people who despise turning tubes and those people won..... this time. However, one of our testers took these step pictures of the 2nd method. This is a great method for a professional finished strap that doesn't have topstitching at all. You just need to be willing to turn the tubes.
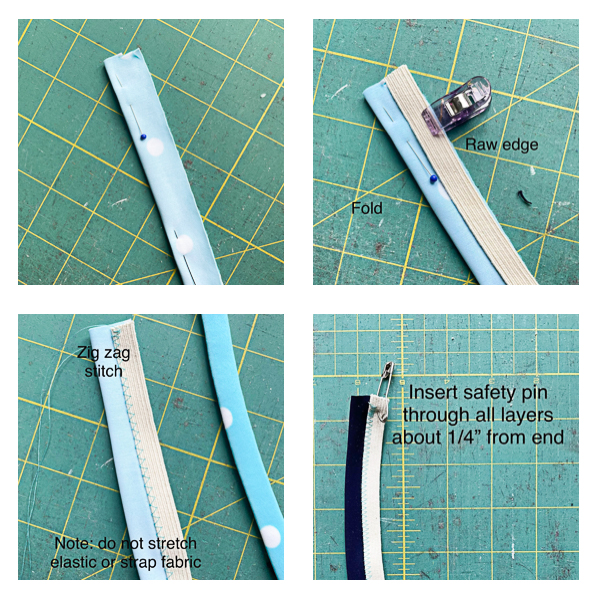
I'm going to let the images speak mostly for themselves, but basically you will start by folding your strap fabric RST and then laying your elastic on one side with the edge of the elastic in line with the long, raw edges of the strap fabric. Using a small zig-zag stitch, sew the elastic to the strap fabric along the inside edge of the elastic. Most of the stitch needs to be on the elastic with just the furthest point of the zig-zag stepping out onto the fabric itself.
Once that is sewn on, turn your strap and Jo Ann provided some nice tips/instructions directly on these images for you. Some tutorials for this strap method will also suggest trimming your seam allowance down to about 1/8" first and that's something you can try as well. Here she did not do that.
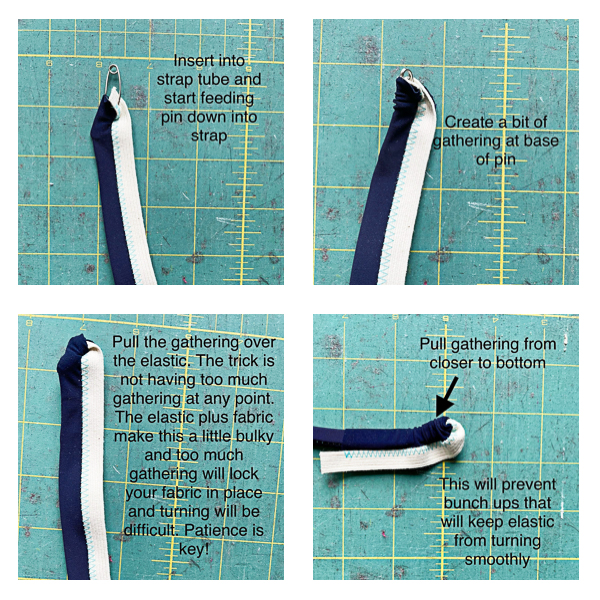
Be sure to check your finished strap with the cut chart length in the tutorial before continuing.
Bra Cup Liner Hack
Now my girls are almost fully out of this size range (moment of crying.... ) and I did go ahead and draft out a couple sizes for my oldest since she's the one that actually needs suits. Yes, I can hear you. We need suits in our junior miss range. For some reason it's still an overwhelming thought for us, but as per usual, our needs here really motivate our designs and clearly next year I'll be out of luck for suit options inside our own pattern store. We shall see how brave I'll feel to tackle a new thing.
Back to my point though. This particular daughter prefers bra cup liners at this point in her life and I don't blame her one bit so I did make hers with this option. I took a few pictures to give you an idea on how to do this as I'm sure that there are a few kids in the top end of this range that would also appreciate it.
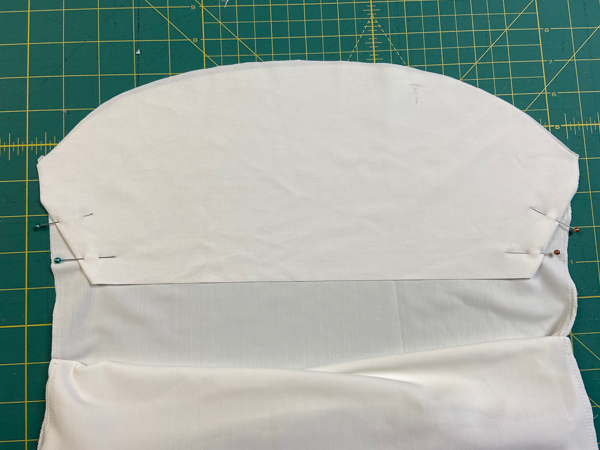
I cut a separate piece of lining ending about 1" SHORTER than the crop cut line on the pattern pieces. I lay it over the right side of the front bodice lining trying to keep the top edge matching. At the bottom of this new liner piece, I folded the outer corners into what will be the inside of the pockets making sure the top of the fold was about 2 1/2-3" up the side of this lining piece. This will be where I slide in the foam bra cup things (literally can not remember the correct name for those right now).
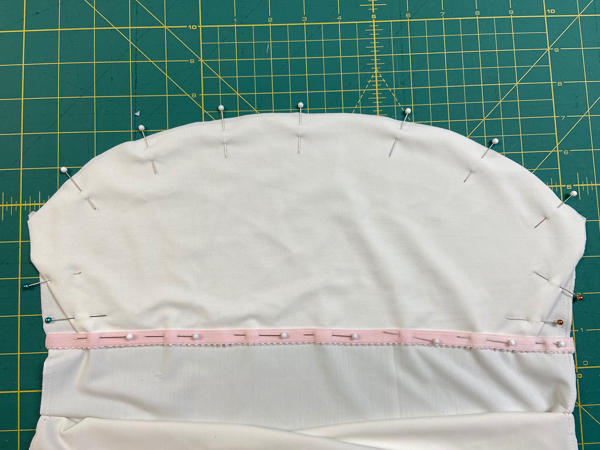
Next I took a piece of lingerie elastic with a brushed side for softness against the skin and simply pinned it over the raw edge at the bottom of my new lining piece. I zig-zagged along the elastic so it would still have the stretch necessary and made sure my stitch width was wide enough to secure the raw edge beneath the elastic.
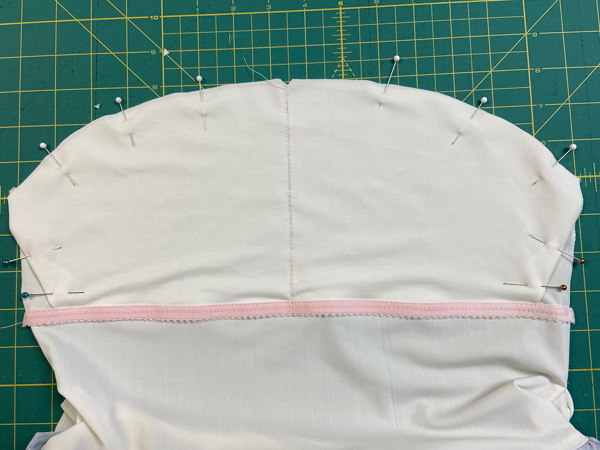
To create the two separate pockets I simply drew a vertical line exactly down the centre of the the liner piece and did a zig-zag stitch along that line.After that I continued sewing as per the tutorial instructions.
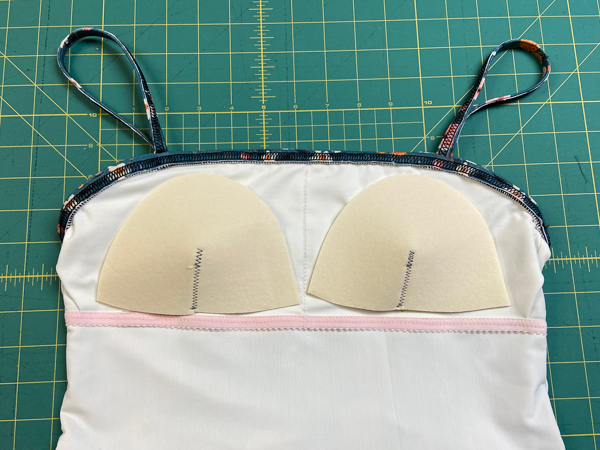
I used the free foam cup pattern from our Wildberry Bralette blog post HERE and trimmed as necessary to make them fit. I'm sure you could use other foam cups as well quite easily.
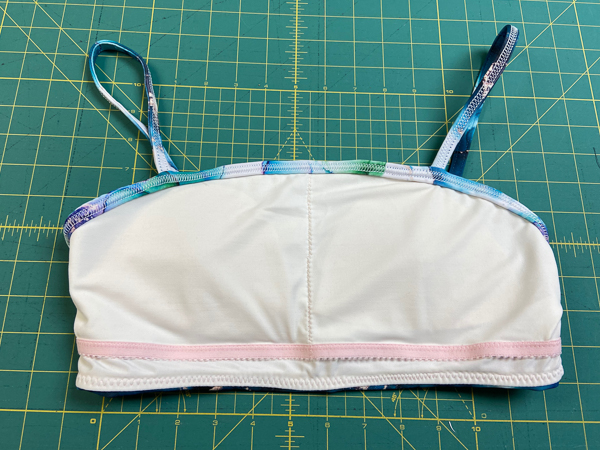
You can see on this picture where I did the same thing on a cropped version and how that liner ends a bit higher than the crop length itself.
I think that's all for Pike news. I mean, I COULD go on and on about other things but at some point I need to realize that more is not always better. So instead you can simply enjoy some more versions of Pike and I'm going to sneak in this shot of how this pattern can be mixed and matched with Minnow. This is the Minnow top with the Pike vintage bottoms. Cute, eh? Again, I'll refer you to the Minnow blog post for a look at that suit and some more mix and match views.

Be sure to share your finished Pike swimsuits with us on IG using #sofipike #sofionadesigns #pikeinthewild or share in our FB group where we love to see your version of our patterns.